Building a Visual Podcast for Game Data
Stringing together lots of tools to turn a podcast into a video screensaver for Youtube
June 23, 2025
Someone on a Discord im in (hey zhila!) suggested I put Game Data on YouTube. I thought it was a good idea, as YouTube is (surprisingly) the largest platform for podcasts/audio-only content (Also you do listen to Game Data right? My podcast that interviews game creators on deep technical dives into their games?). However, a lot of the podcasts on YouTube often feature recorded video interviews/shows. With Game Data, I didn’t want that to be a part of the show and don’t want to ask guests to have to have a good AV setup (mic is hard enough!), so I started to conceive of what Game Data would look like in video form.
Something simple would to have just been a static image of the logo and the audio reexported as the video, but I knew I wanted a bit more. Turns out, that “bit more” ended up being a bigger tangent than I expected! However, I learned some stuff along the way and thought I’d write it all up, as I think there are some interesting workflow tidbits here that could be broadly applicable to similar efforts.
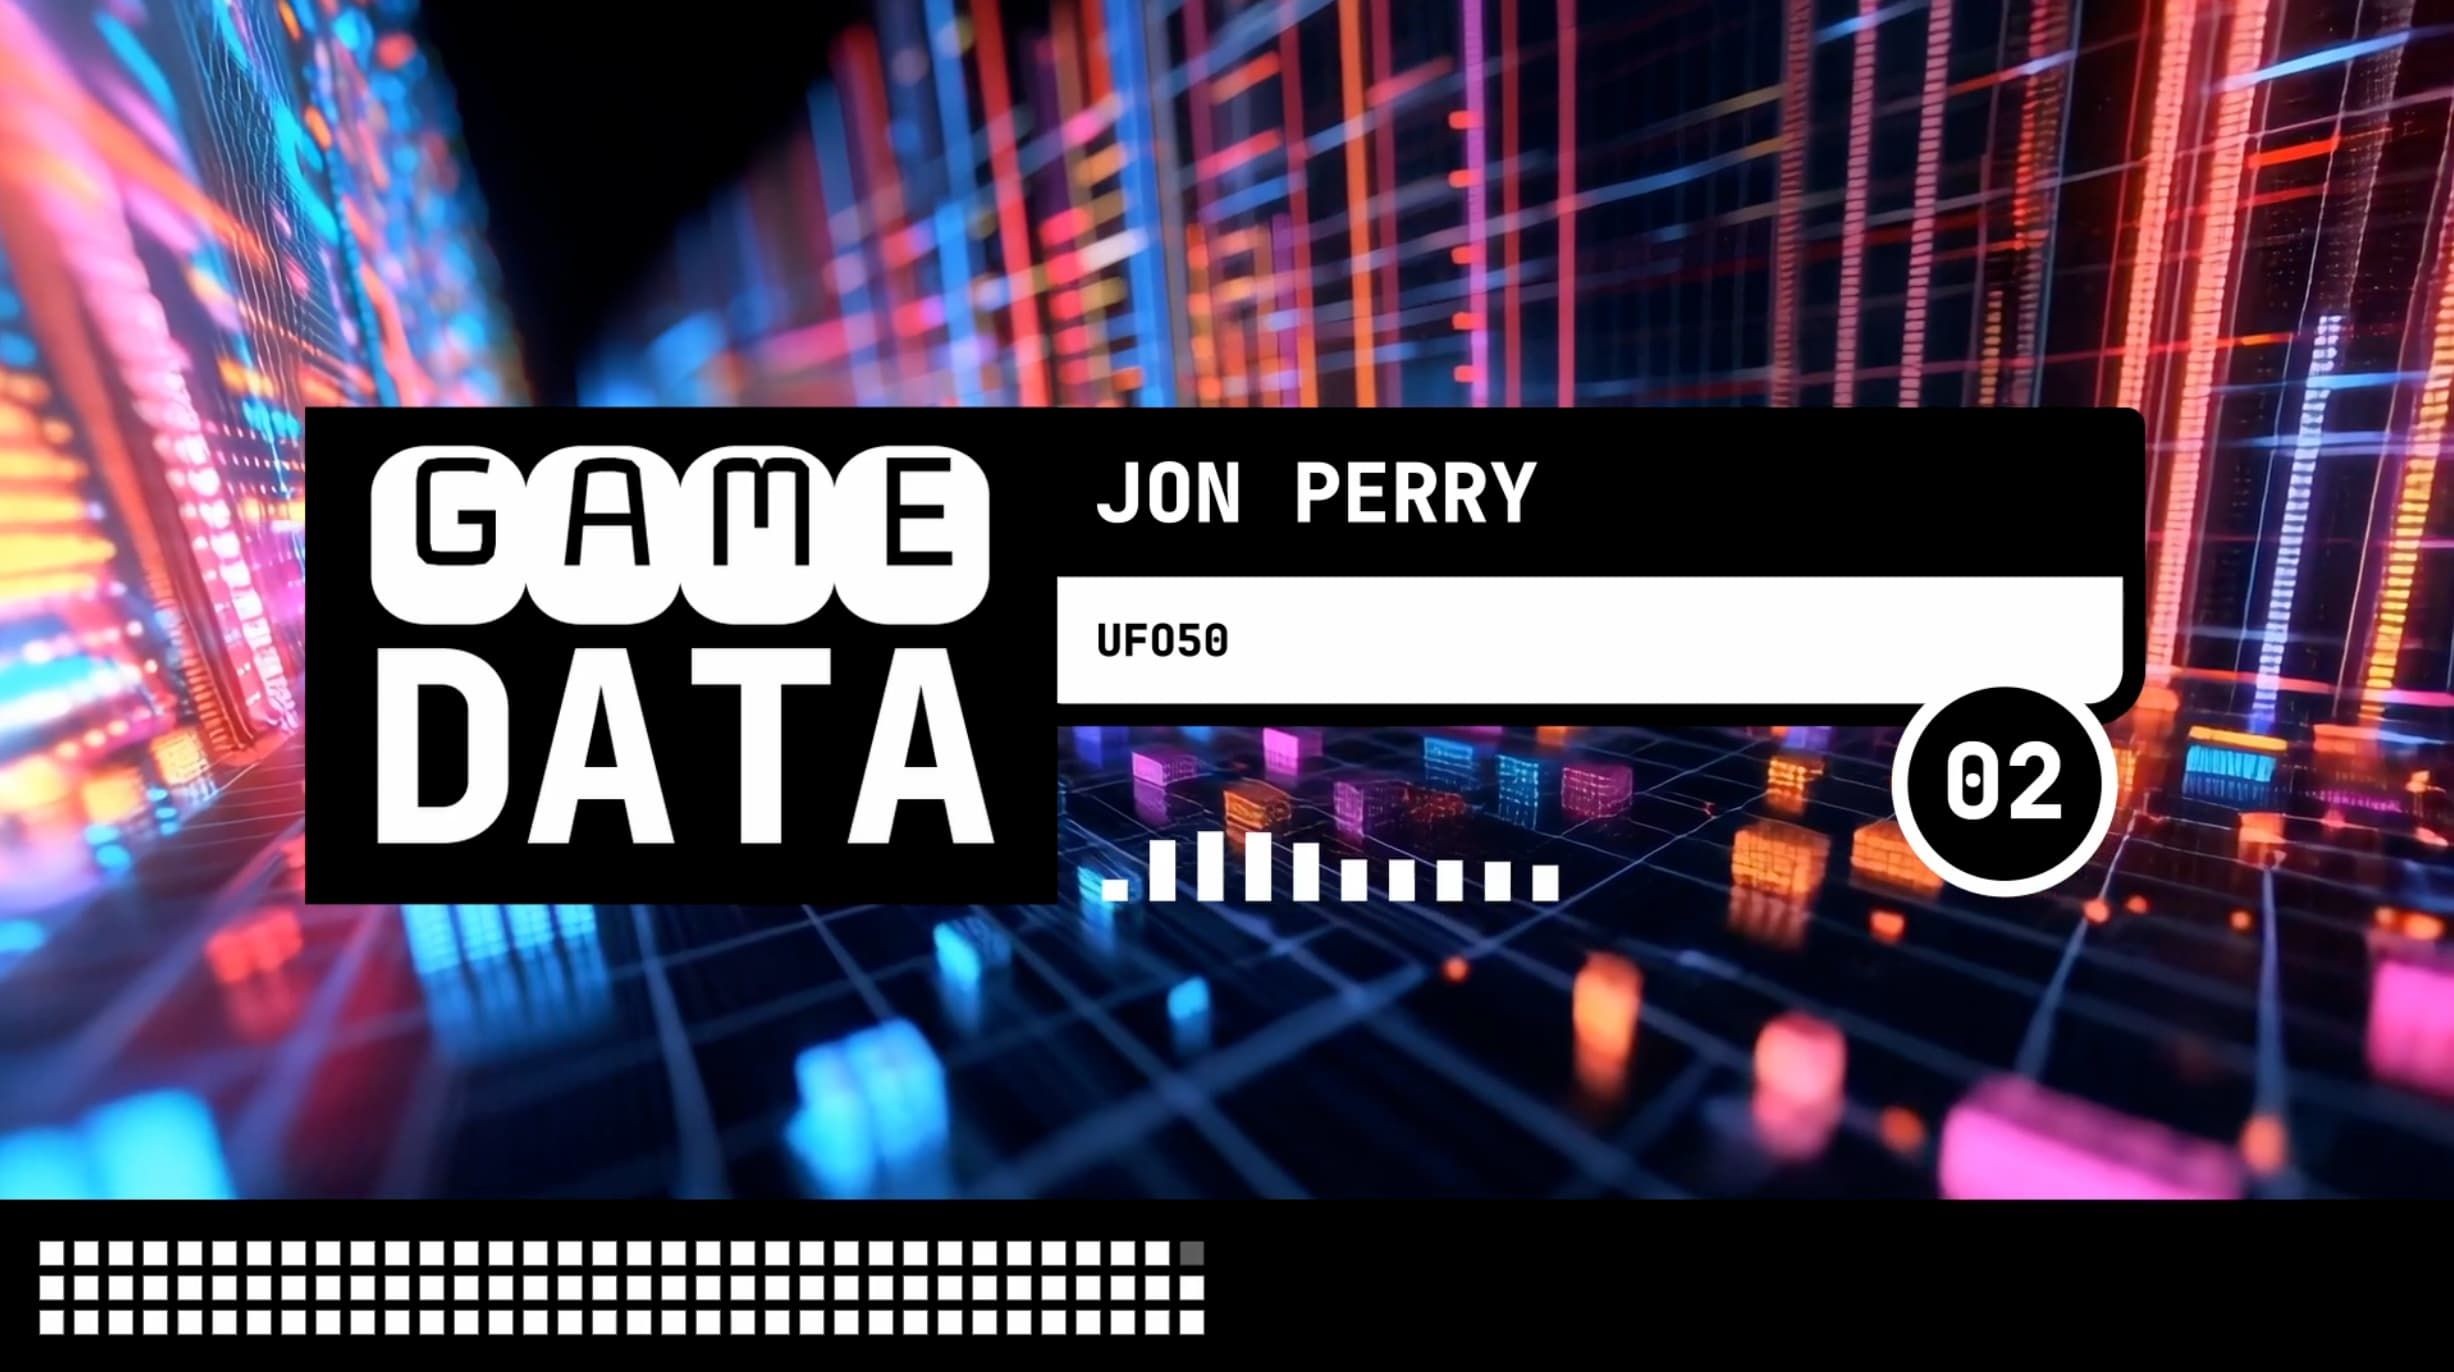
For quick reference to see where we’re going, here’s episode one:
Looks easy enough right? Well… not so fast buddy. Let’s break down all the components below.
Background Video
Game Data has had an image for its “background” on the Substack audio player and elsewhere. It’s typically used as a plate that I put other episode specific content on. Here is is:

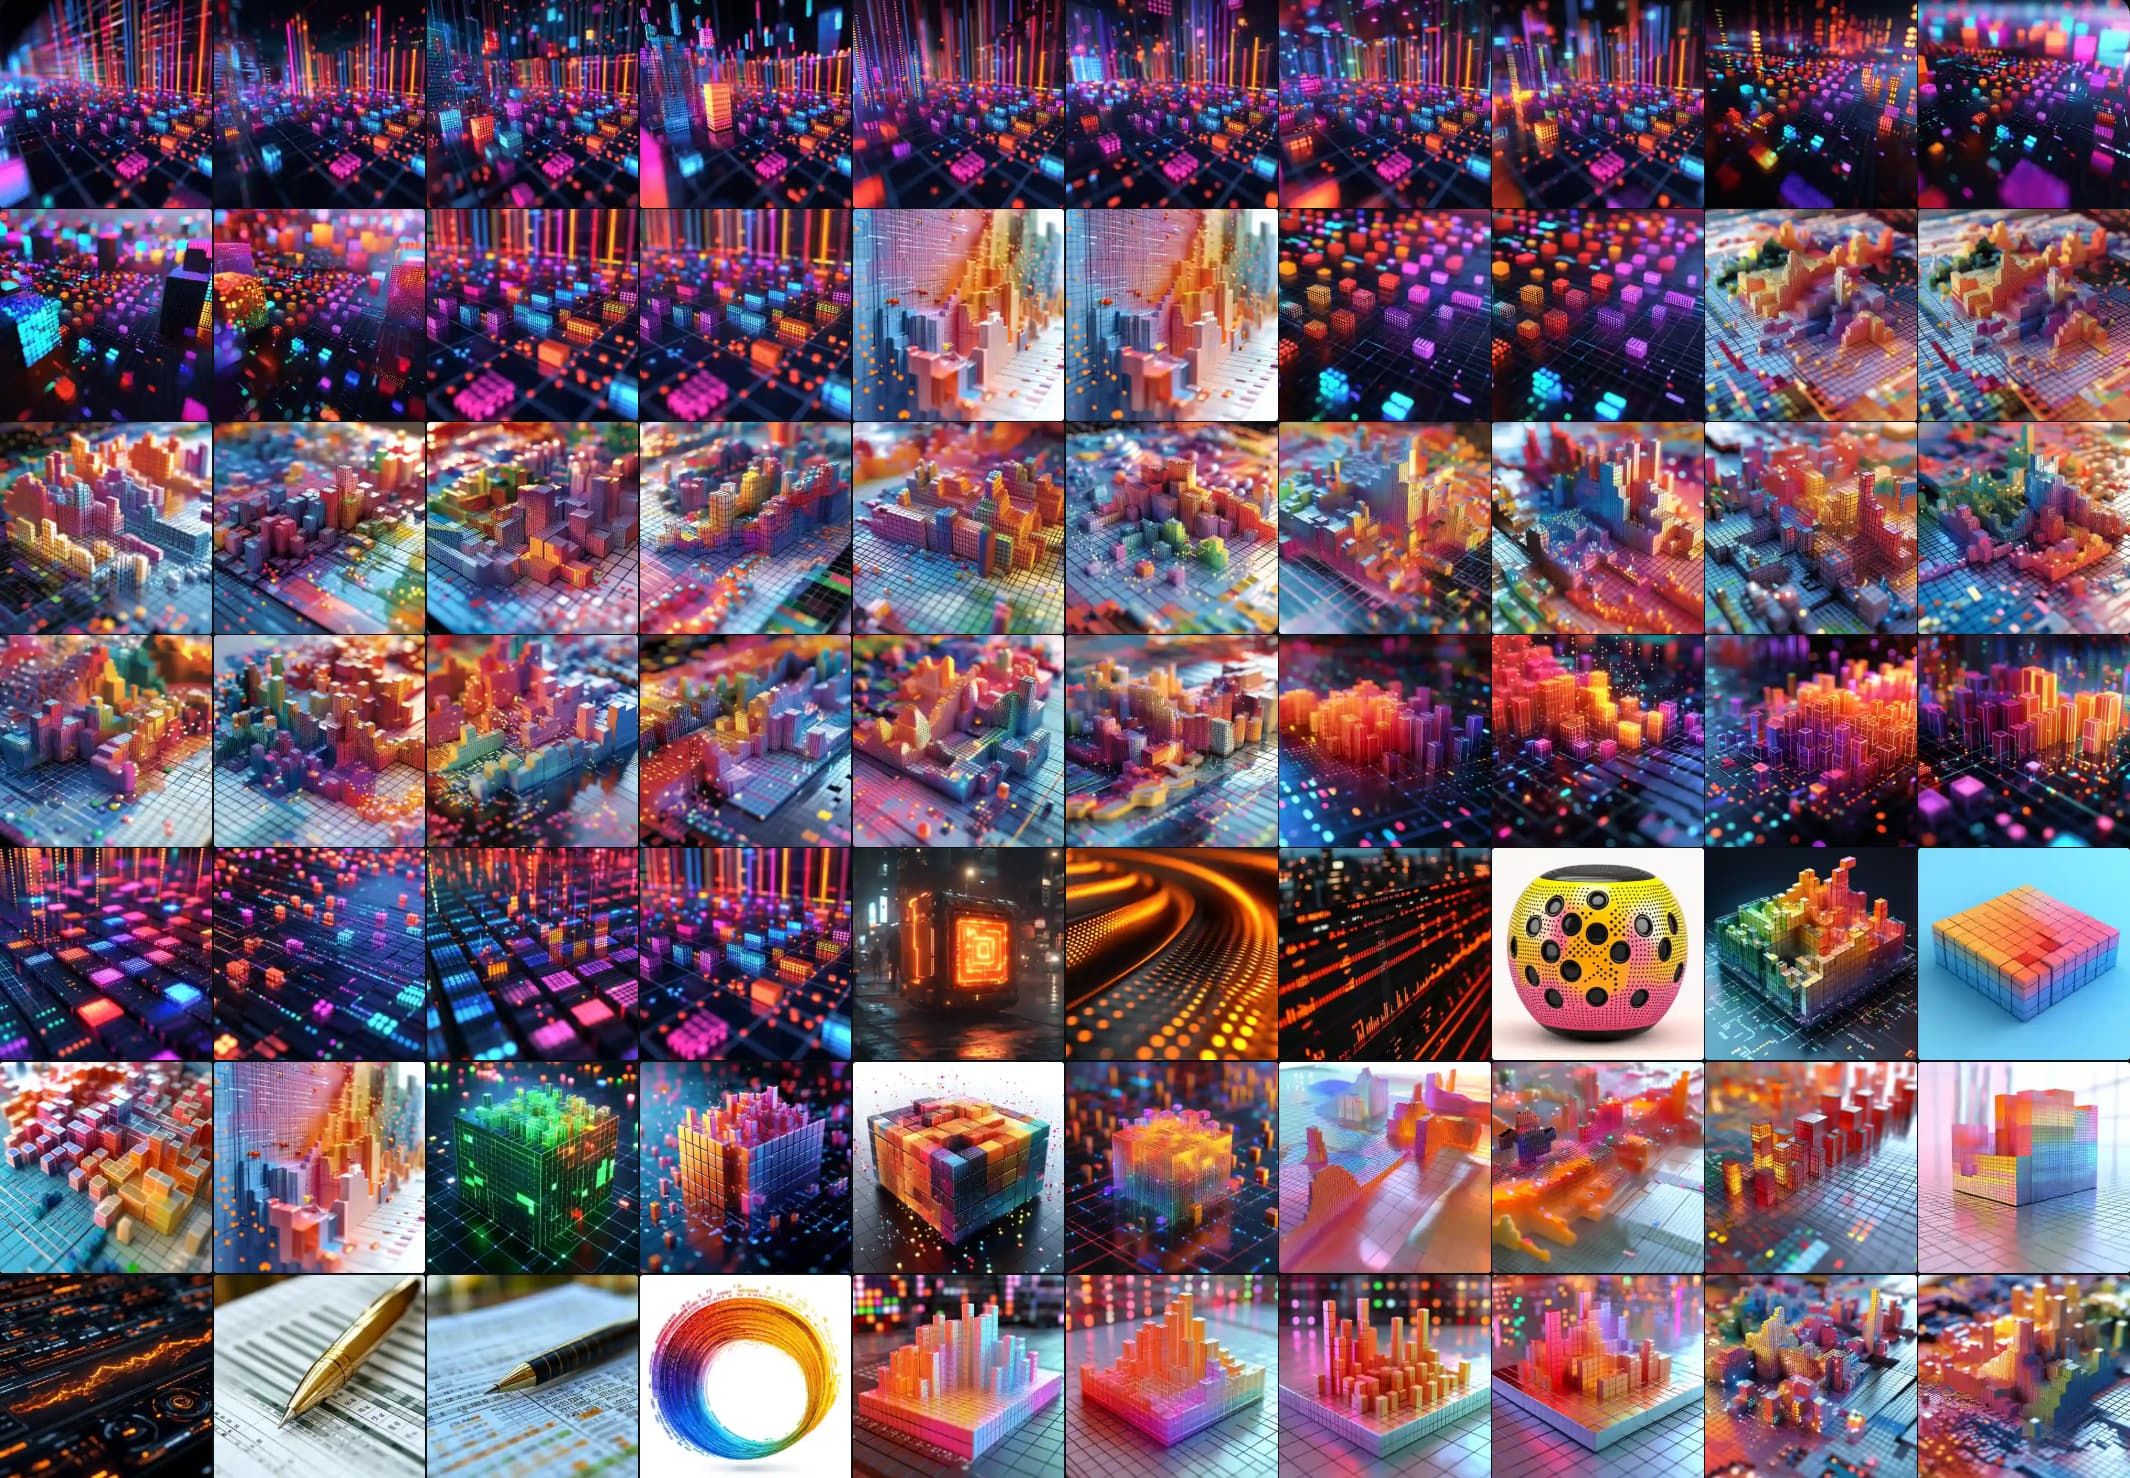
This image was generated in Midjourney about a year ago, with a prompt something like “3D visualization of spreadsheet”. The idea was to evoke peeling back the layers behind something static, and I think this evokes it well. I tweaked and cycled through lots of variations to get to the final image:
This asset was obviously static, and I had initially put it on the podcast video and started working on other parts, but realized that if I’m already rendering some huge video it would be a waste to not leverage the fact I could do video for it as well.
However, it’s a static asset, what am I supposed to do? One option is to rebuild the scene in Blender and render a camera move through the space. That sounds like a lot of work and a bit too much of a rabbit hole for something I didn’t want to spend too much time on (and also something that was largely meant to be covered up by other assets). Instead, I opted to use the path of least resistance generated the video itself with Runway. I fed in the image as the reference and prompting it with the camera move and general scene description:
This ended up working incredibly well! However, Runway only generates 10 second videos, and given that this was going to be paired with a podcast’s audio that was generally at least an hour long, I needed some way to extend it.
Luckily Resolve (what I edited video in) had my back here - using Resolve’s built in time stretch tools, I slowed the video down to 5%, and the used their optical flow setting for frame interpolation. This gave me a good baseline video to work with. I rendered that video out, then re-imported that export back into the project. I then brought that video into the main project timeline, then duplicated it and reversed it, which gave the video the ping-pong effect. I turned that couple of clips into a compound clip, and then just pasted that over and over into the main timeline. Easy!
The nice outcome here (as well as what I’m solving for generally), is that it’s very easy to keep a single reference timeline for any given episode, as trimming/adding in content to match the length of audio is “easy”. With this video ping-pong compound clip, I can just duplicate it on the timeline to match the length of any given episode, and any cut in the compound clip won’t result in stutters from “messing up” the ping pong.
Speaker Banner Logo
This one was a more “traditional” asset, so the workflow for it was a bit more normal. First, I went into my Figma file for the Game Data assets, and started iterating on design options for the banner. Figma, as the world knows, is a great tool for general design work.
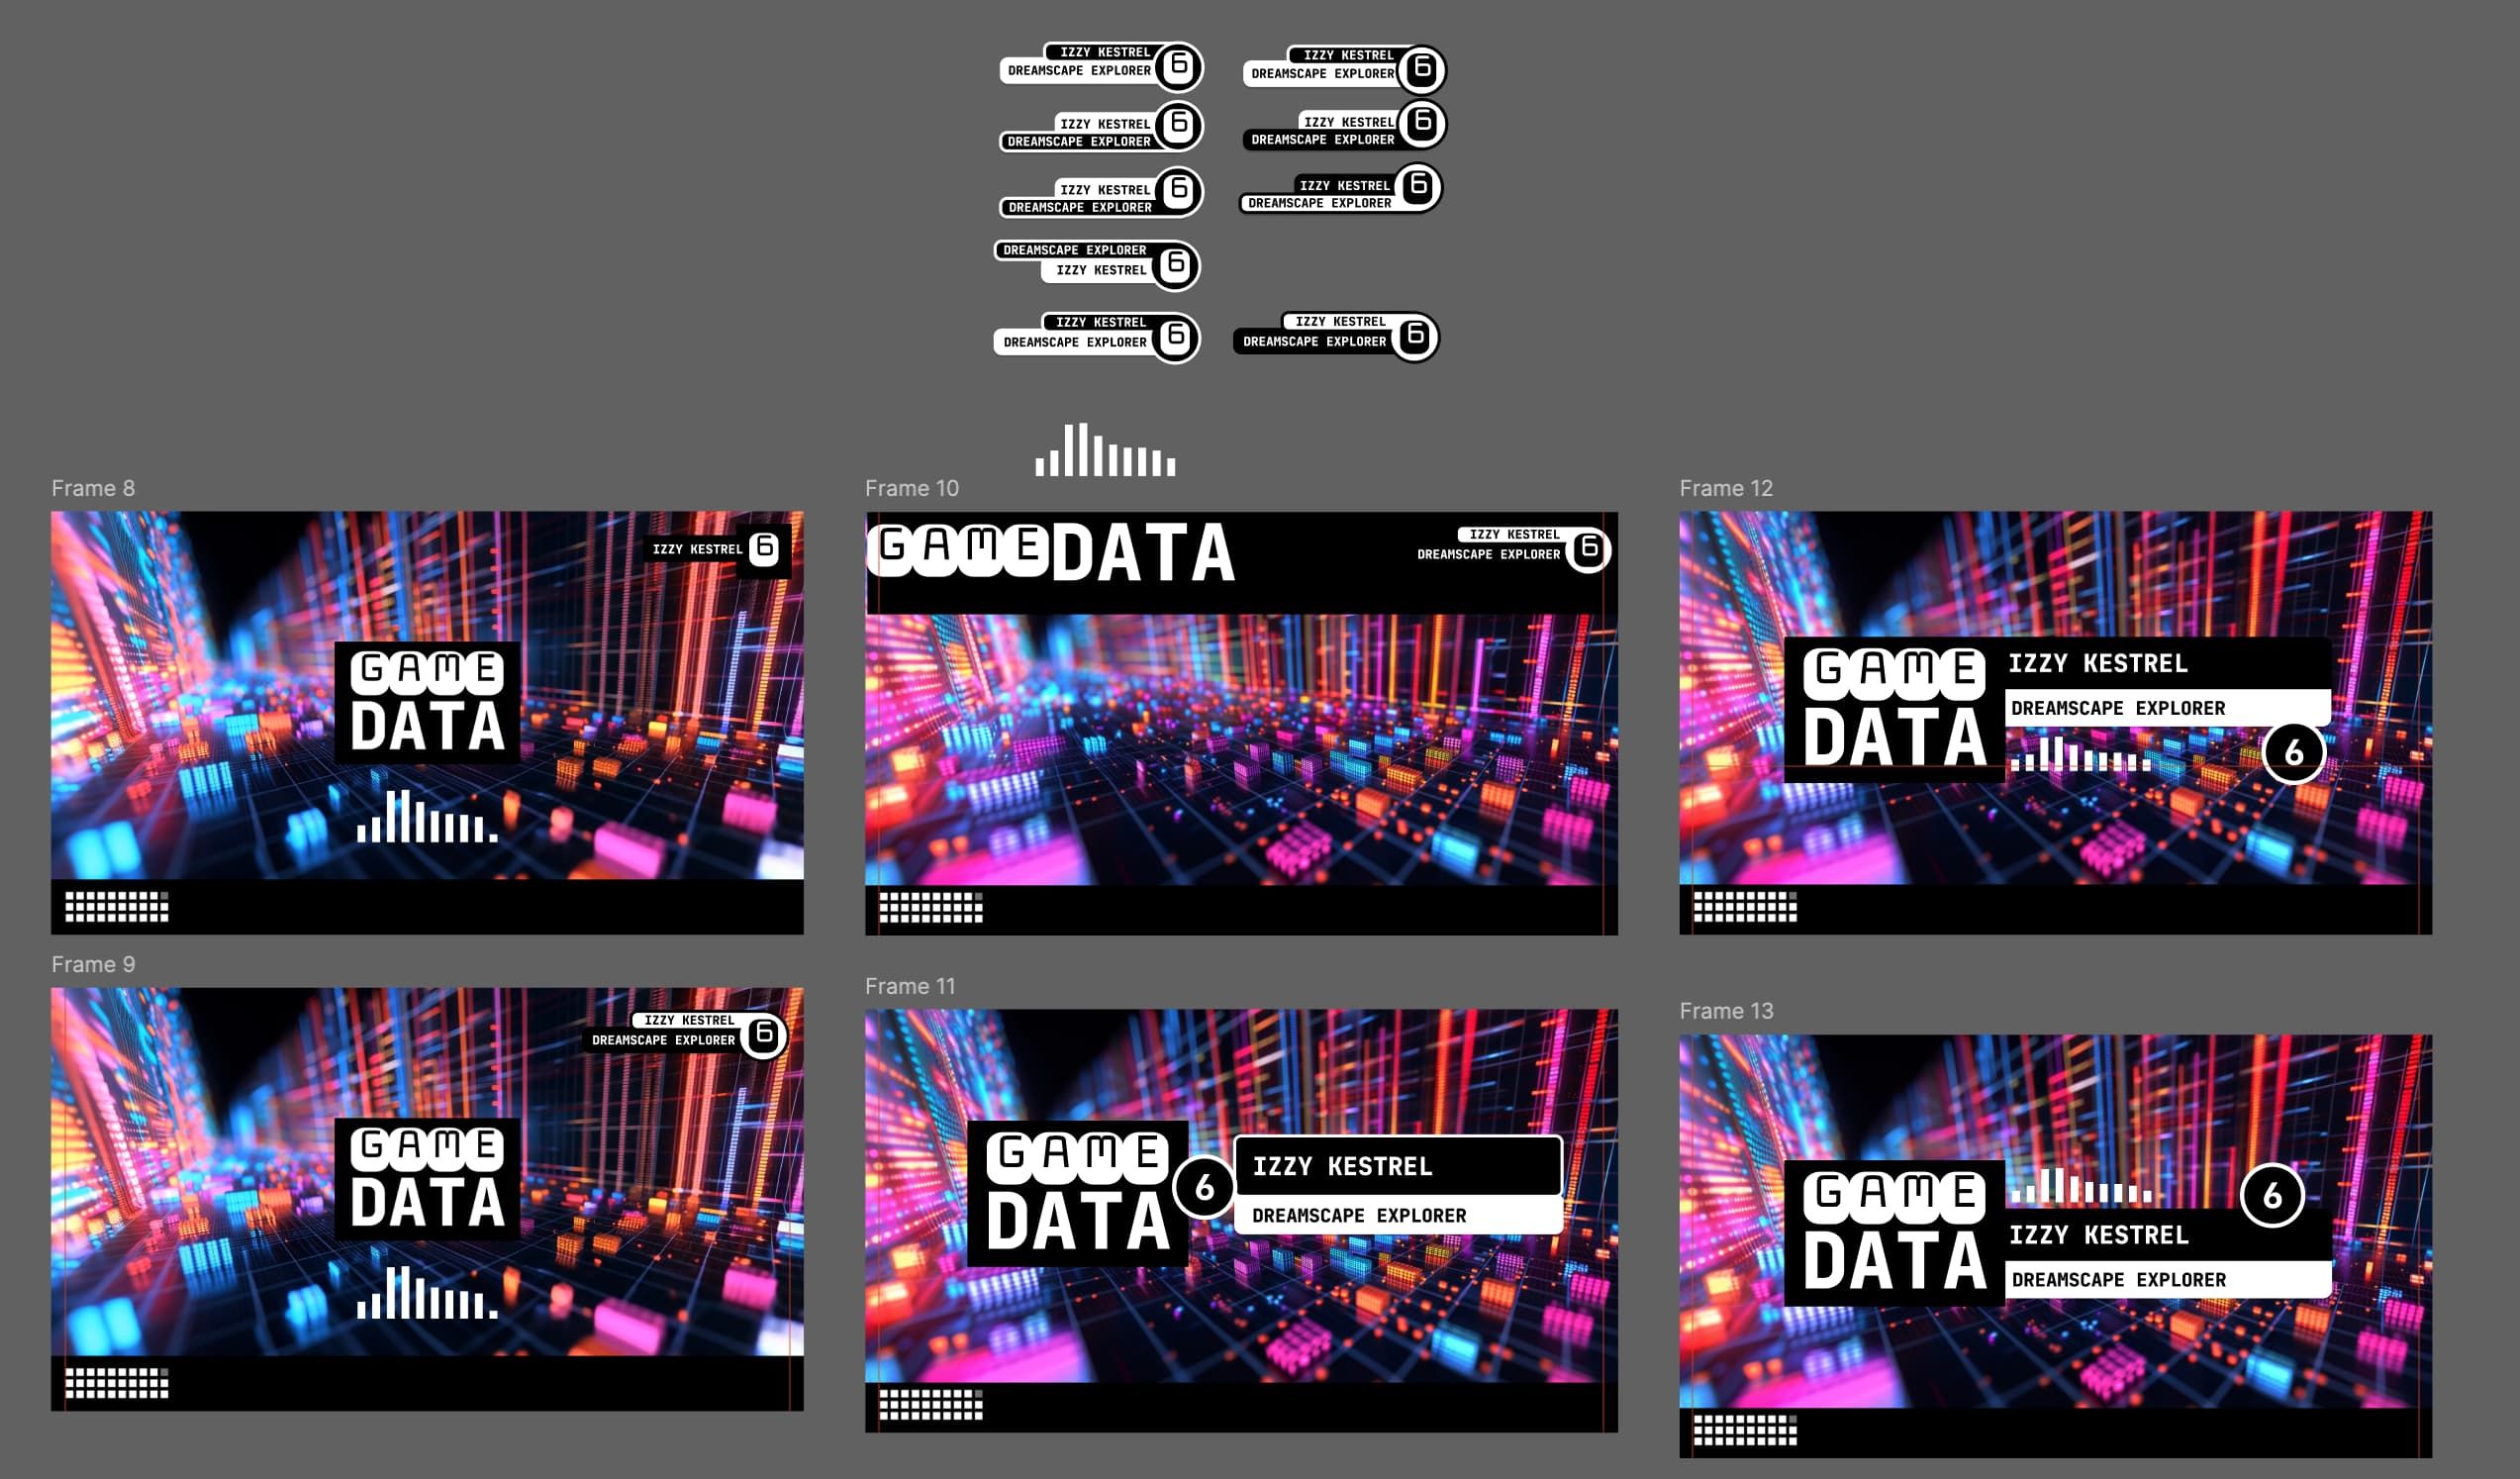
After putting together a few options I picked my favorite (top right here, frame 12). I exported that from Figma, then brought that frame into Resolve to use as a guideline for the next step.
To be clear, there are sort of two ways to go about the next step. One would be the more Adobe Premiere-way where you just export the “complete” asset with a transparent background or bring in the design as a PSD. Basically, you build the asset in a separate program for each permutation (ie. you change the graphic for each episode and re-export). This is a little bit messy and I knew I’d get greater control by doing it a different way, which was to build the asset in Fusion (in Resolve). Here’s the Fusion comp:
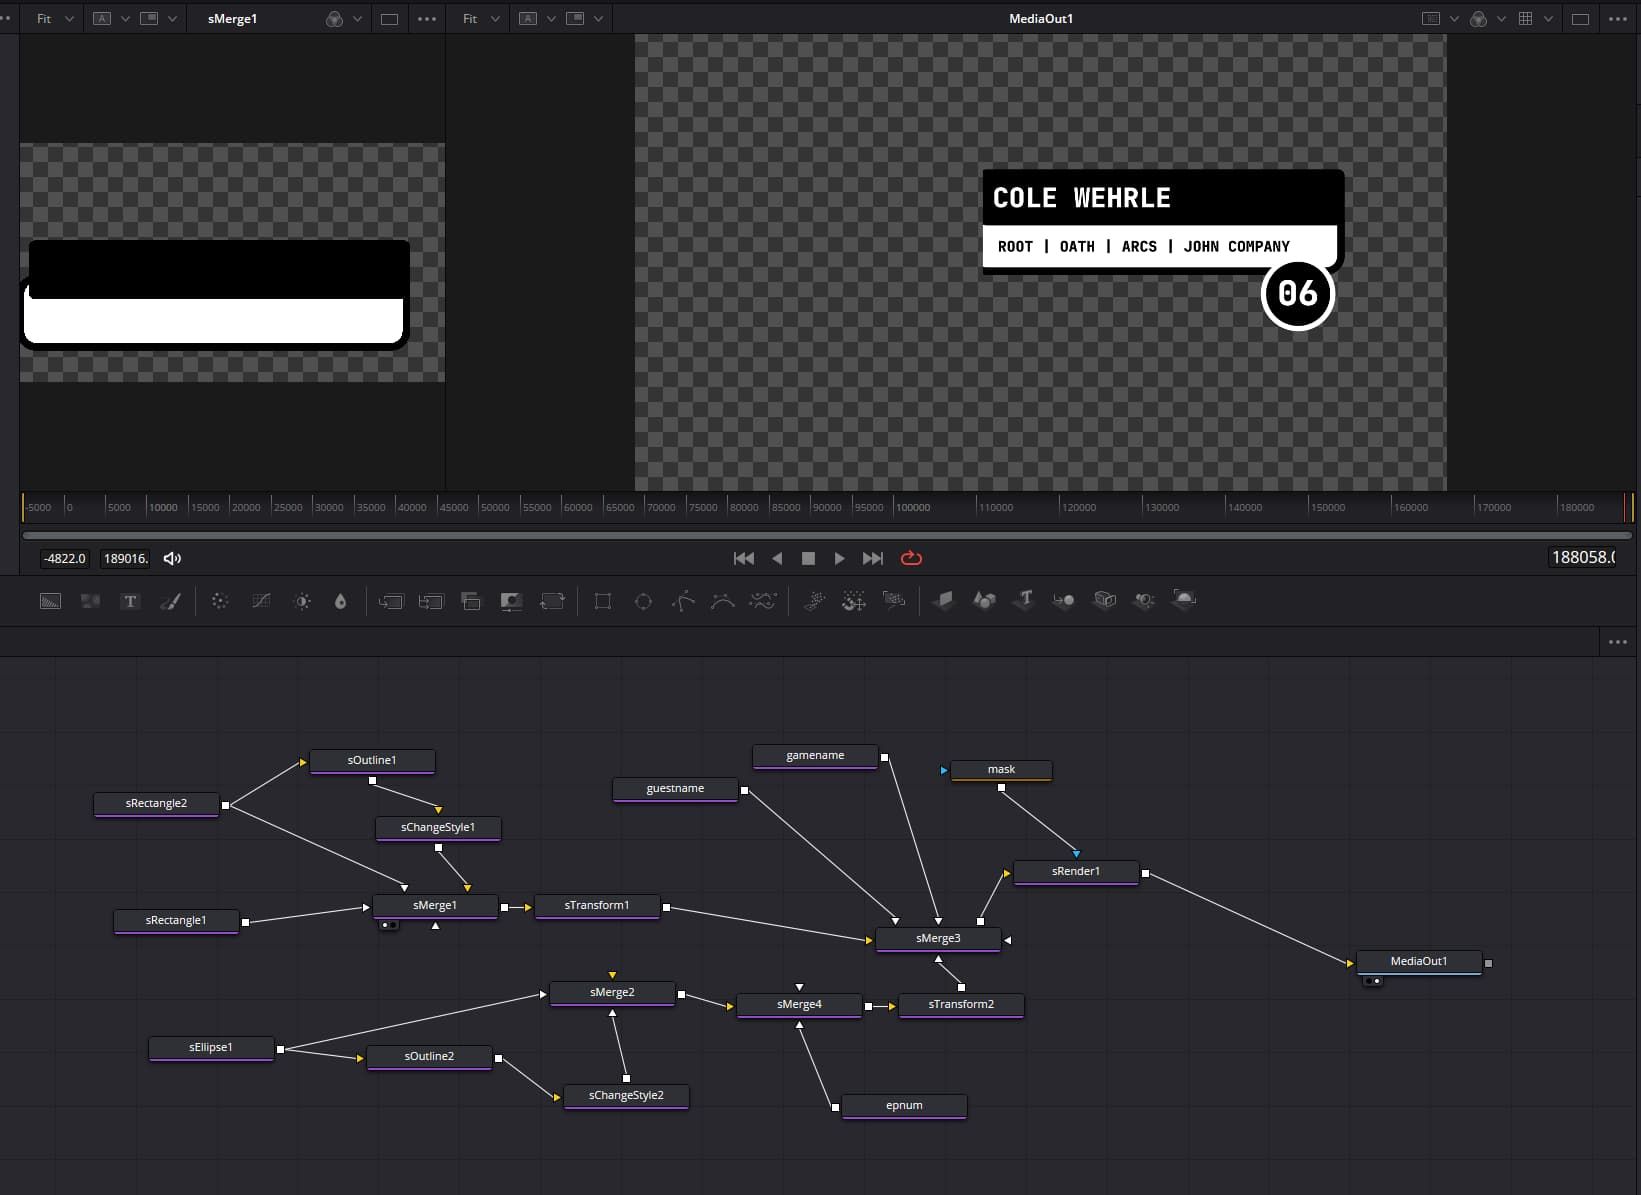
I brought in the exported frame from Figma as a plate to build on top of, and re-created the graphic mostly just using the shape, boolean, and merge nodes. I knew I actually wanted this more CSG-approach after building the asset in Figma (a layer based tool). That uniform outline for example would have been a bit more hacky with faking the outline with an opaque circle, etc., but building it with shape nodes allowed me to just combine shapes and outline their union. Much easier!
What’s nice now too is that updating the graphic for each new episode is just a matter of changing the display text for the “control” nodes. Because the graphic is already in Resolve, there is no additional exporting required, it all just immediately works.
This is then comped on the timeline itself with the actual Game Data logo as a static asset. I suppose I could put it in the Fusion comp with a loader node, but whatever.
Progress Bar
Okay. Listen. This asset was what drove me to make this post in the first place. Because hot damn it was a PITA to figure out. I also think this is something that may be more broadly useful to people, so I’m hoping by recording my workflow here I can help people build similar things.
First, the goal. I wanted to visually represent episode progress in the video itself. The asset is ostensibly simple — it’s a grid of squares that fills up bottom to top, left to right. This happens at a uniform pace across the bottom of the video, such that, by the time you’re at the end of the video the whole bar has “filled”.

Easy enough right? Well, here’s the catch: because the intention of the asset was to be animated across the duration of a whole episode, the asset itself needed to be an hour or more long.
This poses an issue — most “shots” that traditional video comp tools expect you to edit are like seconds long. Additionally, they are not generally GPU-accelerated and are composed on the CPU. This means exports in these tools are slow normally, and nearly infinitely slow if you need to export a “shot” that is an hour or so long.
I ran into this directly when trying to build the asset in Fusion, but building it there initially did help me ultimately when I figured out the “correct” workflow for building it. So I’ll talk first about the path I went down in Fusion that failed at the very end, and then what ultimately worked.
Doing it the wrong way in Fusion
Step one is to make the simplest element first - a blinking square. This was pretty simple, and just a matter of adding in keyframes every few frames to move between an alpha of 0 and 1. When the shape is “done”, the alpha is at 1 so it has the appearance of “sticking”.
I’ll also note here as it’s relevant below, the square animation was 100 frames.
Next it gets a bit more complicated. I wanted the shape to fill bottom to top, then across the bottom of the screen. So I first add in a duplicate node that duplicated the shape “up” (using a Y offset for the duplicate). Playing the comp at this point would cause all the squares to blink in unison, which I don’t want, so I added in a time offset of 100 (the length of the square animation) to the duplicate. This means that a given column of animation was 300 frames long.
Next, I wanted the squares to fill across the bottom of the screen, so I add in another duplicate node that duplicates the column and an X offset so the squares are spread across the bottom. There was no exact math here, but 34 squares “looked” good.
This duplicate then has its own time offset that is the frame animation length of a column, 300. This makes it so the comp now is implicitly 10200 (34 columns x 300 frames each) frames long if I want to have the whole animation play for the squares.
All good right? Well…
Again, my video is hours long, which is far more than 10200 frames (~7 minutes). Natively placing this asset on the timeline would mean the animation would complete after only ~7 minutes. Resolve does have rate stretch tools, as seen when I made the background video above, but it doesn’t work for Fusion comps.
Luckily there are time stretch nodes! I can throw one of these onto the end of my fusion comp graph and get the effect I want. However, the math is a bit tricky, so I use an expression to calculate the rate:
time * 10200 / comp.RenderEnd
What this does is slow down the rate of the animation to animate itself dependent on the length of the comp itself in the timeline. This means that, as the clip in the timeline increases or decreases in length (based on varying episode lengths), the animation will still play to completion no matter what it’s size is.
So let’s slap this on a timeline and render and…
Oh no. OH NO.
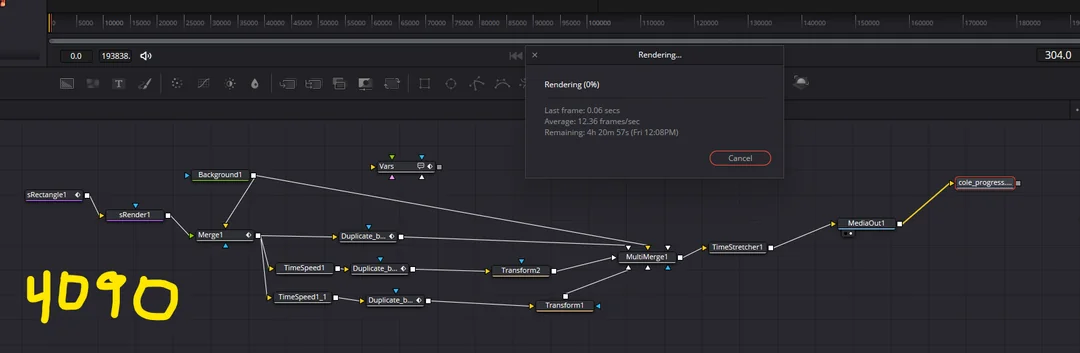
Rendering this simple sequence of animating squares was going to take FOUR HOURS on a machine with a GTX 4090 and 64 GB of RAM…. What? Not only this, but this was without any other assets in the timeline! And in reality the export actually never finished. It slowed down the further it got in the render. I ran it overnight once and after 16 hours it never actually rendered. What??
I took it to Reddit. Surely I was missing something? (Also worth noting the comp up there varies slightly from what I described above but the same principle of the workflow holds. I was just experimenting).
Turns out yes, or more that I was making an assumption about Fusion that wasn’t true. Specifically, that it was “GPU Accelerated”. This is true, sort of. Shape nodes, like the blinking square, are accelerated. However, as soon as you render them to the Fusion canvas with an sRender node, they basically move to the CPU (likely a texture buffer read — aka SLOW). This means that the render itself, across an hour or more duration, was effectively only using the CPU. It was as if the whole comp was literally doing a texture read from the GPU and duplicating that multiple times every frame. So the render was impossibly slow.
Welp. I tried tons of different versions of this to fix it, but kept running into crazy render times. One thing I didn’t try that MIGHT have worked was to literally just create 102 shape nodes (34x3 squares total) and manually keyframe each of them. That sounded painful, but I think it may have worked.
So I felt like I had to find a new approach.
Getting it to work with Cavalry
I knew a proper motion graphic tool was what I should be using here. I cancelled my Adobe sub a long time ago and have mostly moved away from it so After Effects wasn’t an option. I also didn’t need to do anything 3D so didn’t feel like I needed to use Blender or Cinema4D. It was just 2D motion graphics! I honestly considered just coding it my game engine or Unity and using something like OBS to record it. However, I remember hearing about a tool called Cavalry a while back and thought it seemed really cool, but hadn’t had a reason to engage with it yet. So I said, well why not now!
Cavalry functions in a similar layer based interface to something like After Effects, so I kind of had my bearings immediately. Also, with the work I did in Fusion, I knew how to “build” the animation, provided it had the same basic primitives/nodes. Turns out — it does!
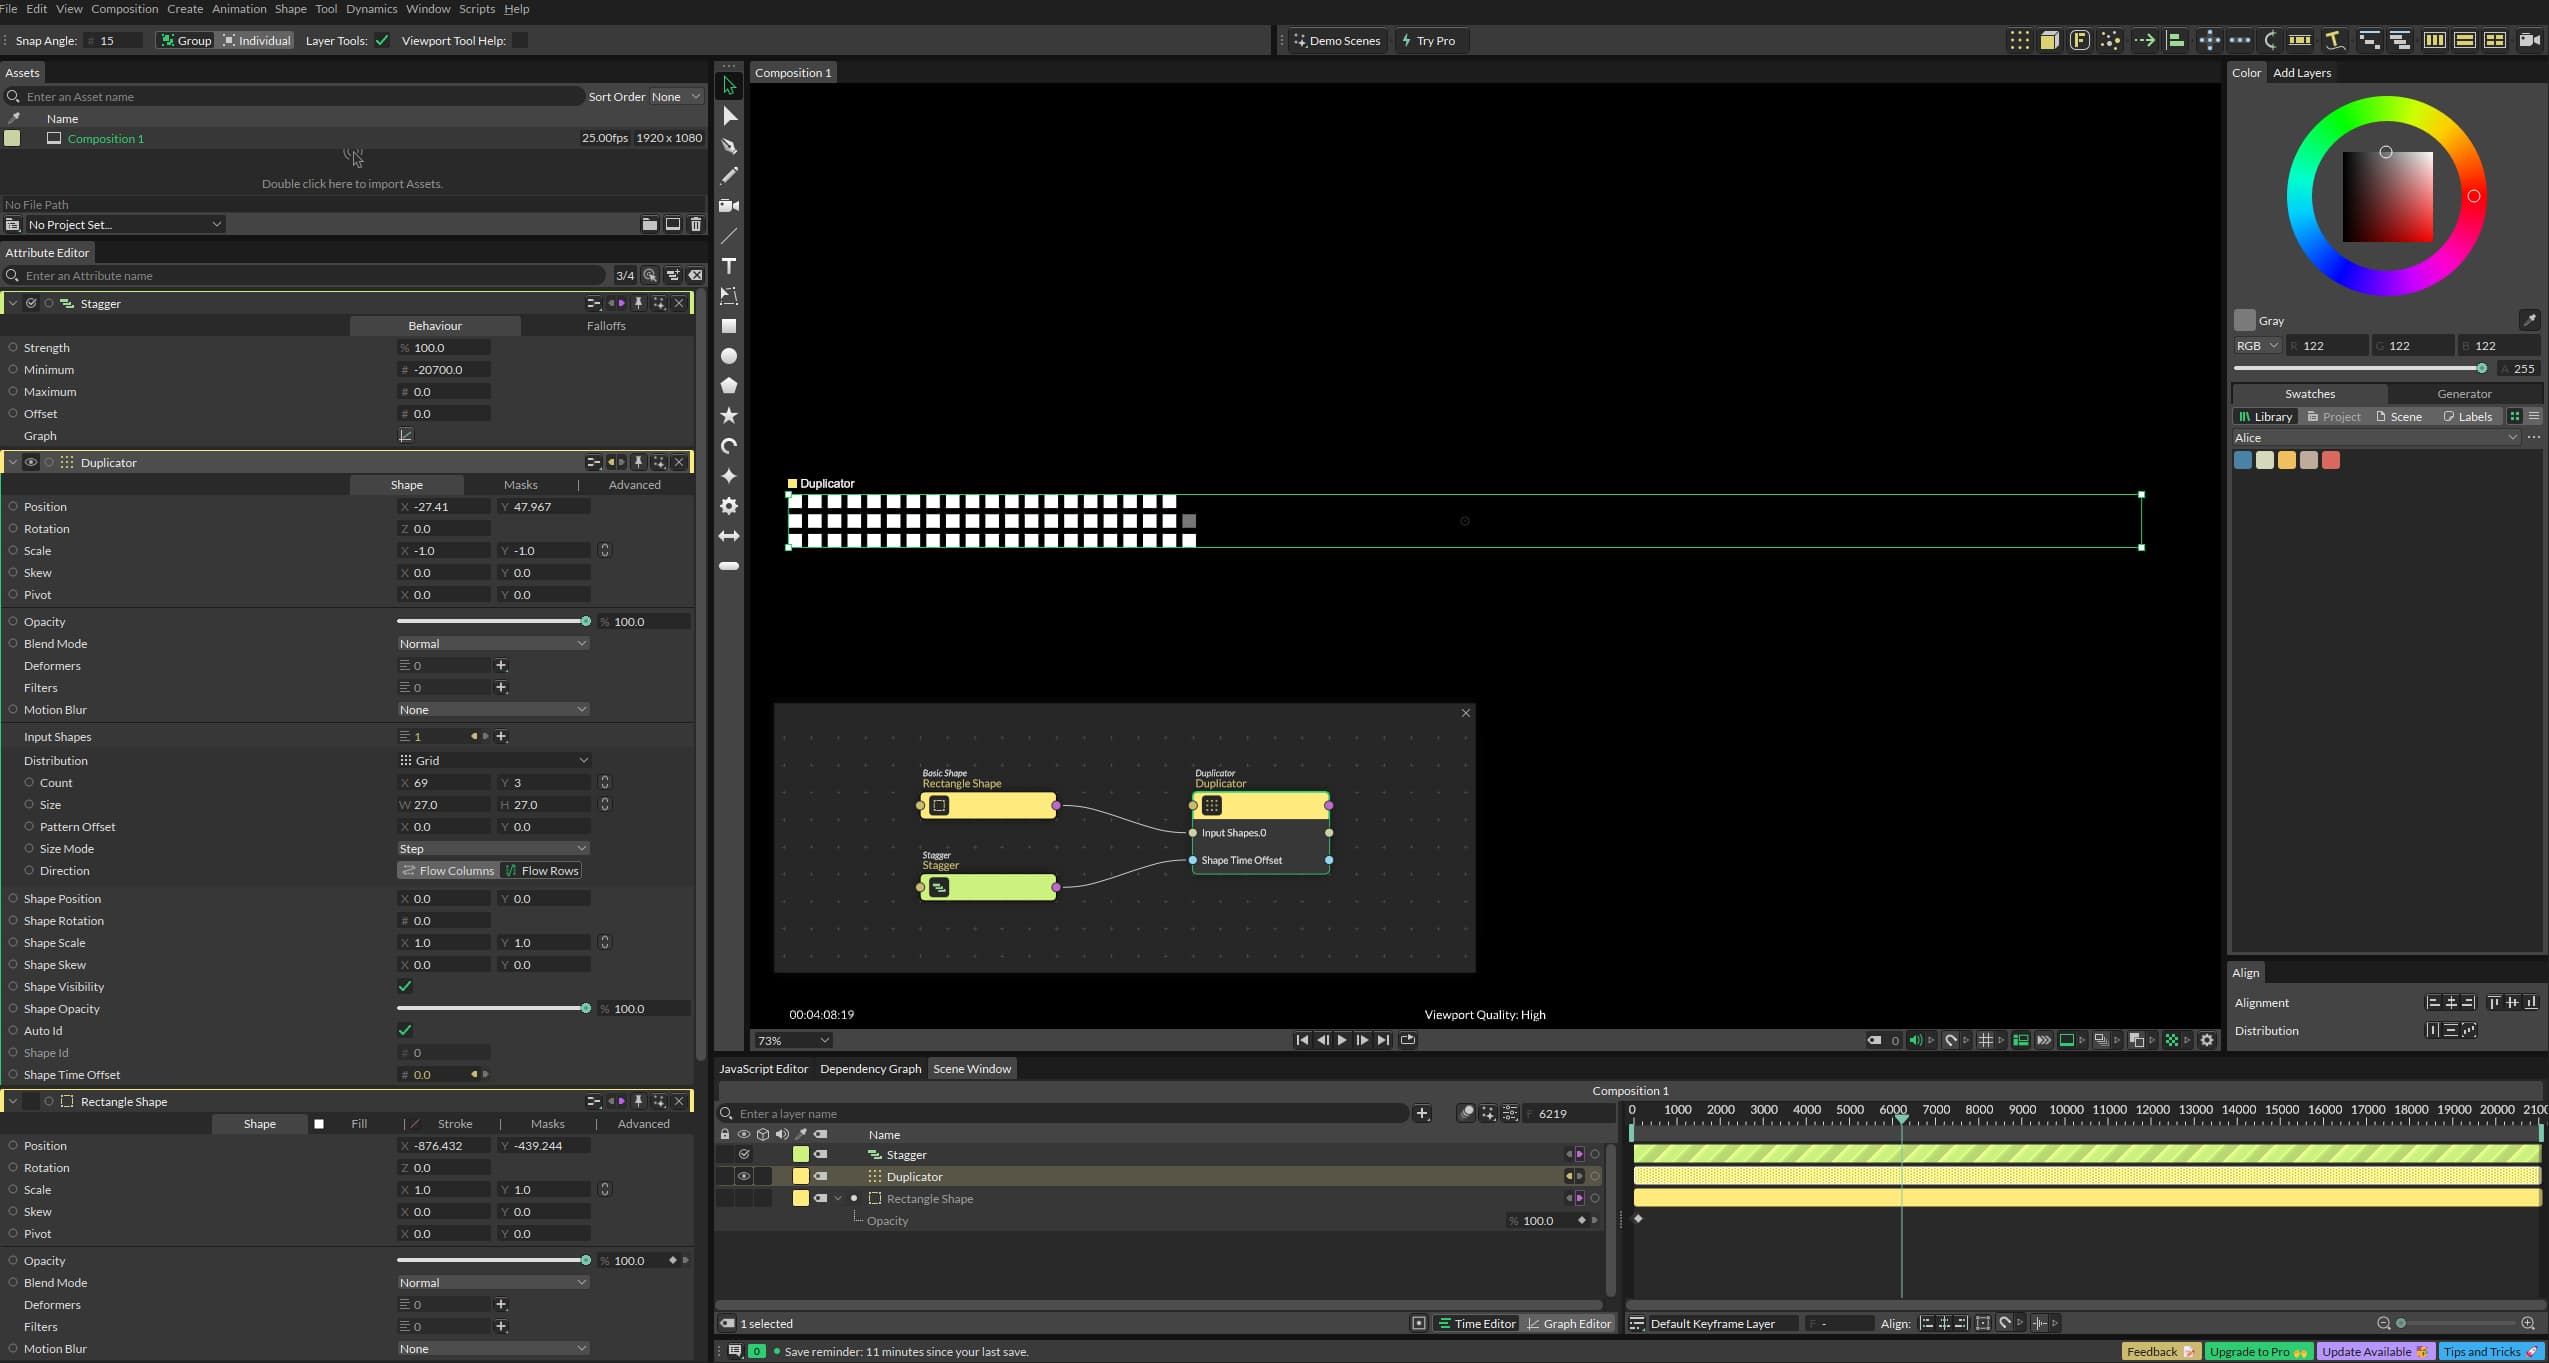
It’s basically just a Rectangle Shape, Duplicate, and Stagger, with Stagger connected to the Shape Time Offset in Duplicate. Easy! The key here was to set the Minimum offset in stagger to be the length of the “full” animation, effectively stretching out the delay across each individual shape. The number (-20700) is different than the Fusion number because I tweaked the animation (and also followed Cavalry’s docs here on how to properly offset).
I then rendered out this animation as a high bitrate MP4 file and it took… 20 minutes. Easy.
I then brought that export into Resolve, applied a screen blend mode to get rid of the black background, repositioned it in the video and viola!
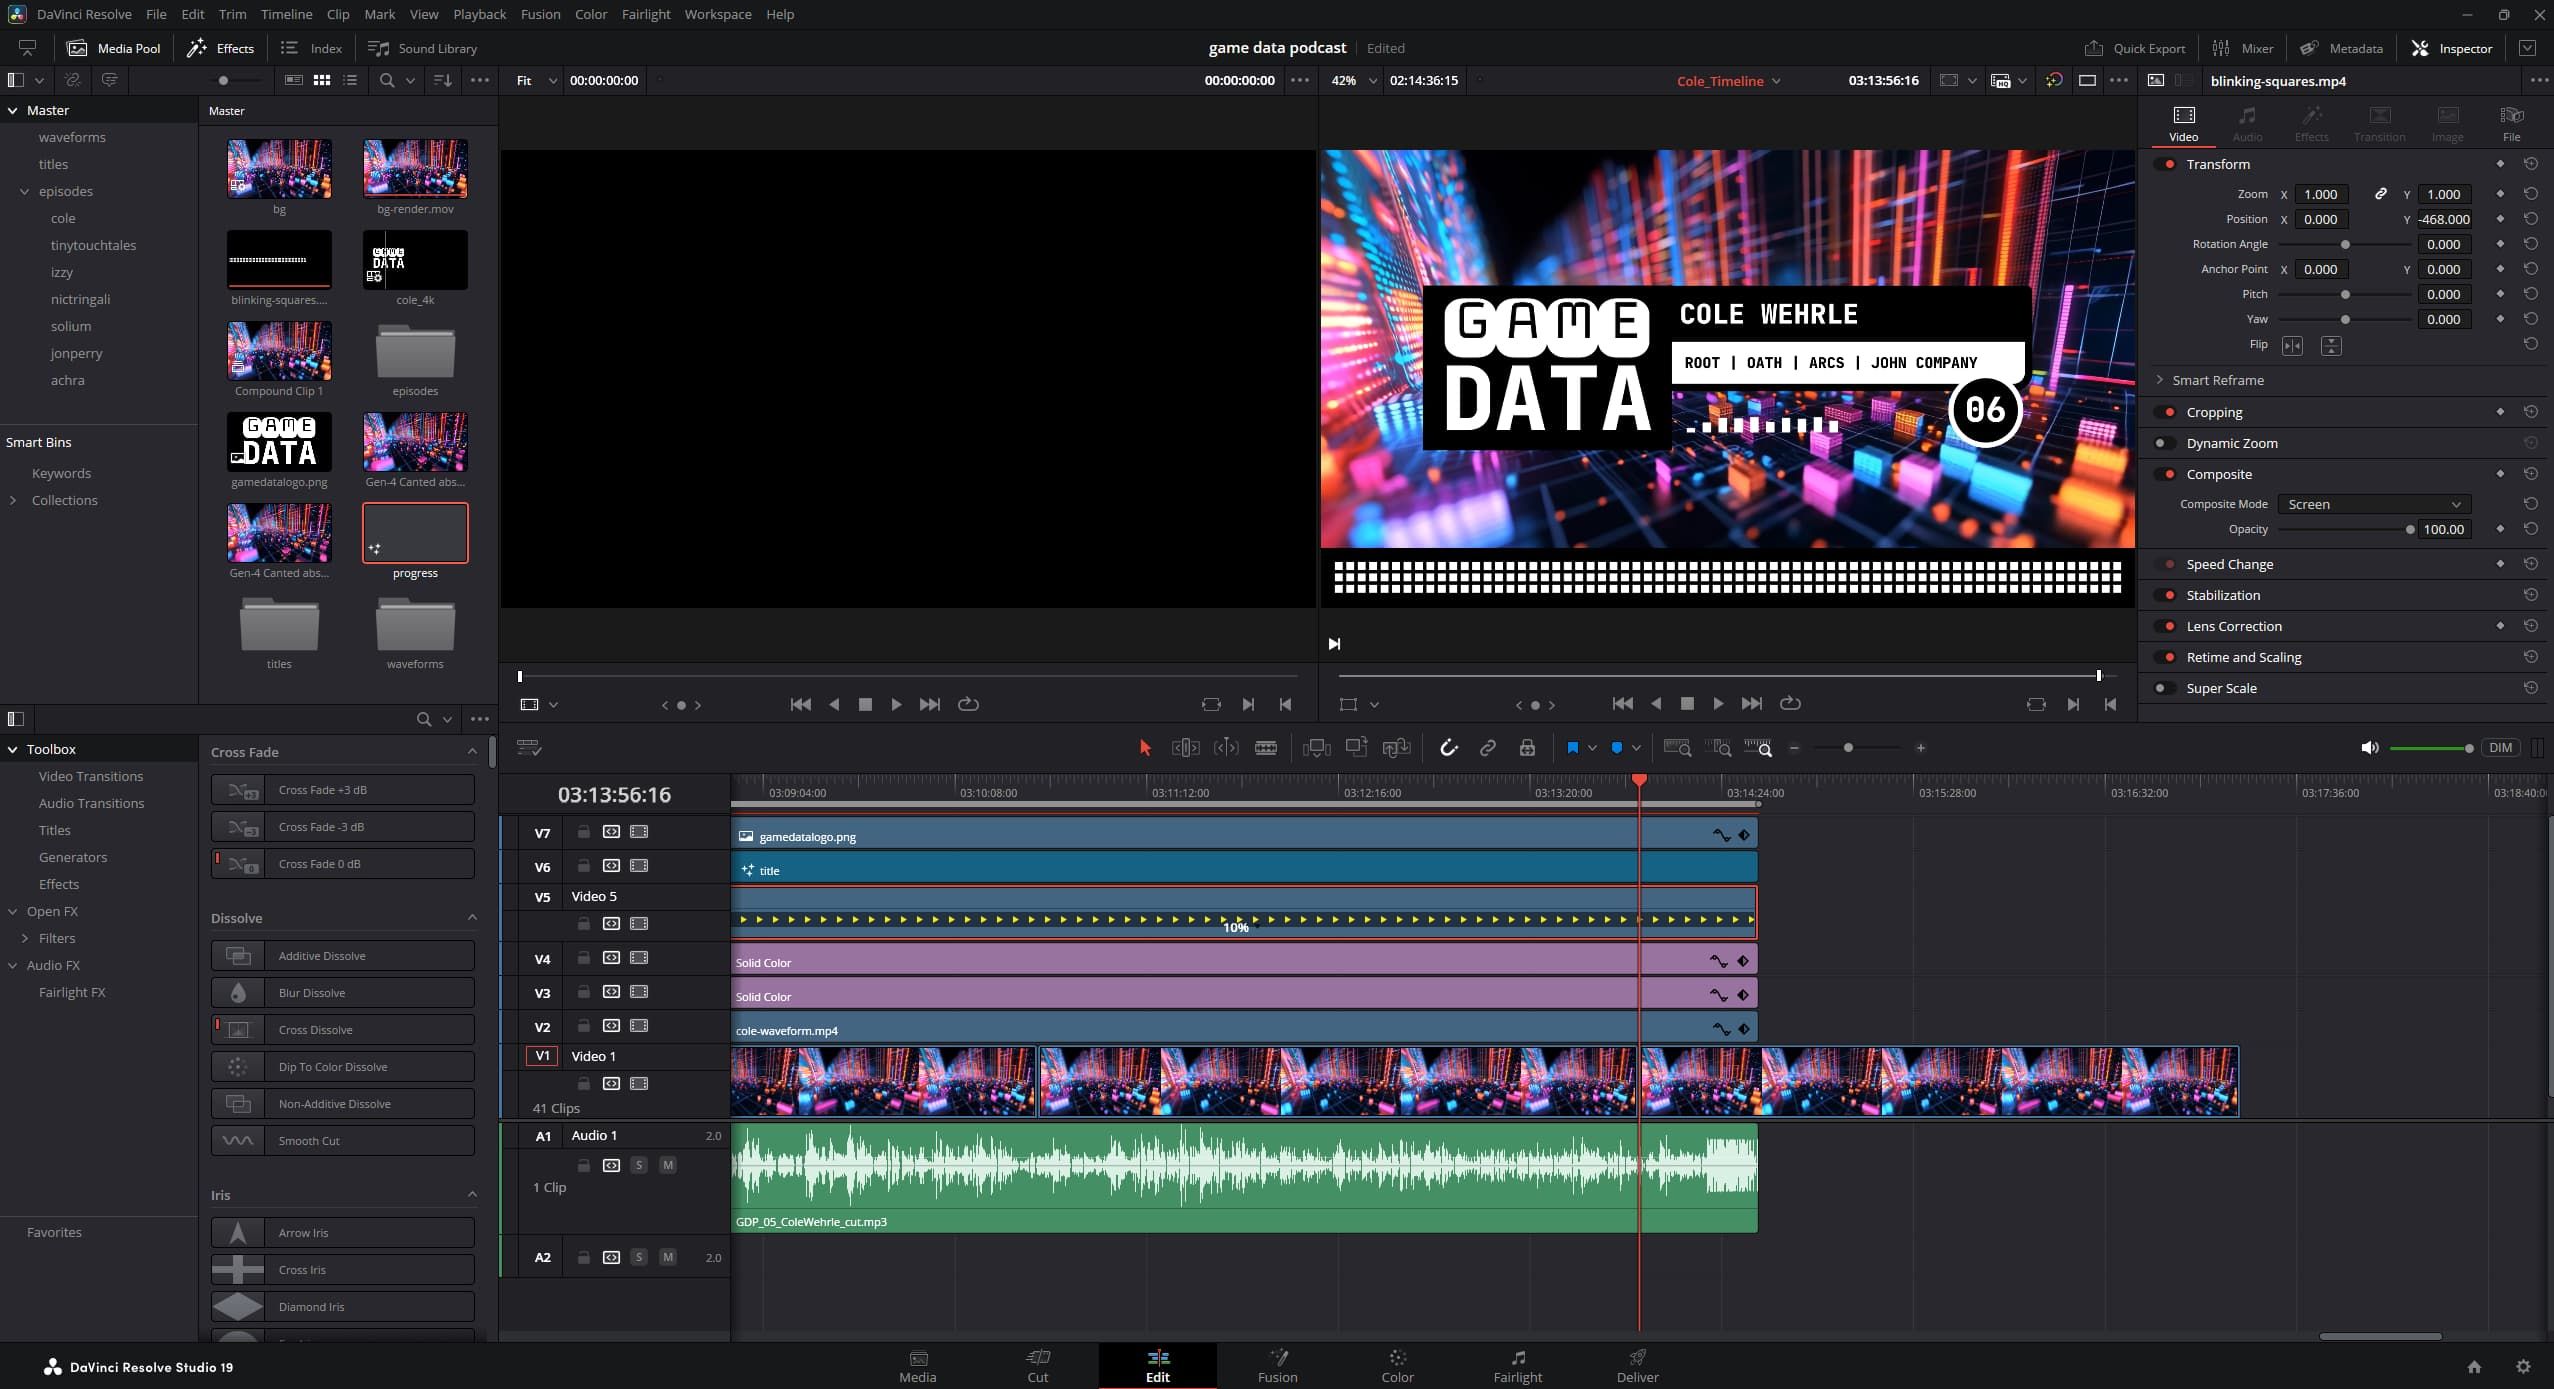
Now, to be clear the video itself was still only 14 minutes long. But rate stretching with optical flow in Resolve fixed that. You can see above in the Cole Wehrle video that the video is slowed down to only 10% of its source speed, but you wouldn’t be able to tell looking at the export.
That said, one downside of this approach is consistency. Though different videos have the same number of squares, they all animate at a slightly different speed based on the final duration of the podcast episode. Originally I had an idea that I would dynamically adjust how many squares there were so the animation of an individual square across each episode would be uniform, but ultimately decided against that approach to keep it simple. For now, when I make a new episode, I just compress or extend the squares video to match the length of the episode.
Whew!
Waveform/Spectrum Visualizer
Now while the squares animation was a hard nut to crack from a render speed perspective, this one was hard to crack from a process perspective. The idea here is to provide a “waveform visualizer” for the episode to give it more a more dynamic aspect that make it feel more “alive”. I thought it would be as easy as dropping in some pre-made Resolve effect onto the timeline, but turns out that it’s far from the case (for now!).
If you look around online there are two major ways to do this. Well three actually — one way is that people just fake it. The two other ways are either:
- Convert your source audio to midi (which often requires you convert it to wav first), then feed that into a Fusion comp with a “Midi Reactor” modifier.
- Use We Suck Less’s Reactor scripting kit and the Audio Waveform tool (with Wav files) to do something similar.
The latter I was less into because I didn’t want to start moving out of “blessed” Resolve workflows and wanted to get the most I could out of doing things myself. So I tried out the first option, following along with this tutorial here. I also got Claude to write a script to do midi conversation of audio in FFMPEG.
I diligently followed all the steps and had a waveform that looked good, and queued up a render with everything else in place. I started the render and estimated time was about 3 hours. I’ve got a beefy rig (remember, a 4090), so this seemed high, but whatever. And then it ticked up to 3.5 hours a few minutes later. Then 4 hours, 5 hours, etc. It capped out around 7 and then I let it run overnight only to wake up with 5 hours left.
Something was wrong.
I think the issue is two fold. Again, this is the type of thing they expect you to render like <1 minute of footage with, so we’re hitting CPU limits again. But also I think what’s happening here is that the opening and closing and seeking of the midi file is maybe happening EVERY RENDERED FRAME by Resolve, which is absolutely tanking the performance of the render.
So once again a dead end using Fusion and I started looking for alternatives. I looked more into the Reactor one, but saw similar complaints about render times for long comps. I could save the midi generation step there (it uses wav), but the render time itself for long comps was still bad.
The thing here that’s hard is that you do have to pay the waveform generation tax SOMEWHERE. Some program needs to do the reading and waveform generation from the audio file. Resolve/Fusion are clearly not the right tools for this.
I started to consider (again) using my own game engine or Unity for this. Writing a little program that used some media loading library and built a waveform off of that. After some more digging I actually found this program that does something very similar: Wav2bar (thanks reddit). I played with this a little bit but it felt kind of hacky in a way I didn’t want to have become a core part of my workflow. So I kept looking.
On one of the Reddit threads talking about Resolve MIDI performance for this same use case, someone mentioned a workflow I thought was interesting. Basically, the free editor kdenlive has exactly the type of effect I thought Resolve had - a realtime audio visualizer waveform effect. What they do is take the audio into there, setup the effect visualizer, render that out from kedenlive, then bring THAT into Resolve.
I tried this out… and it worked perfectly.
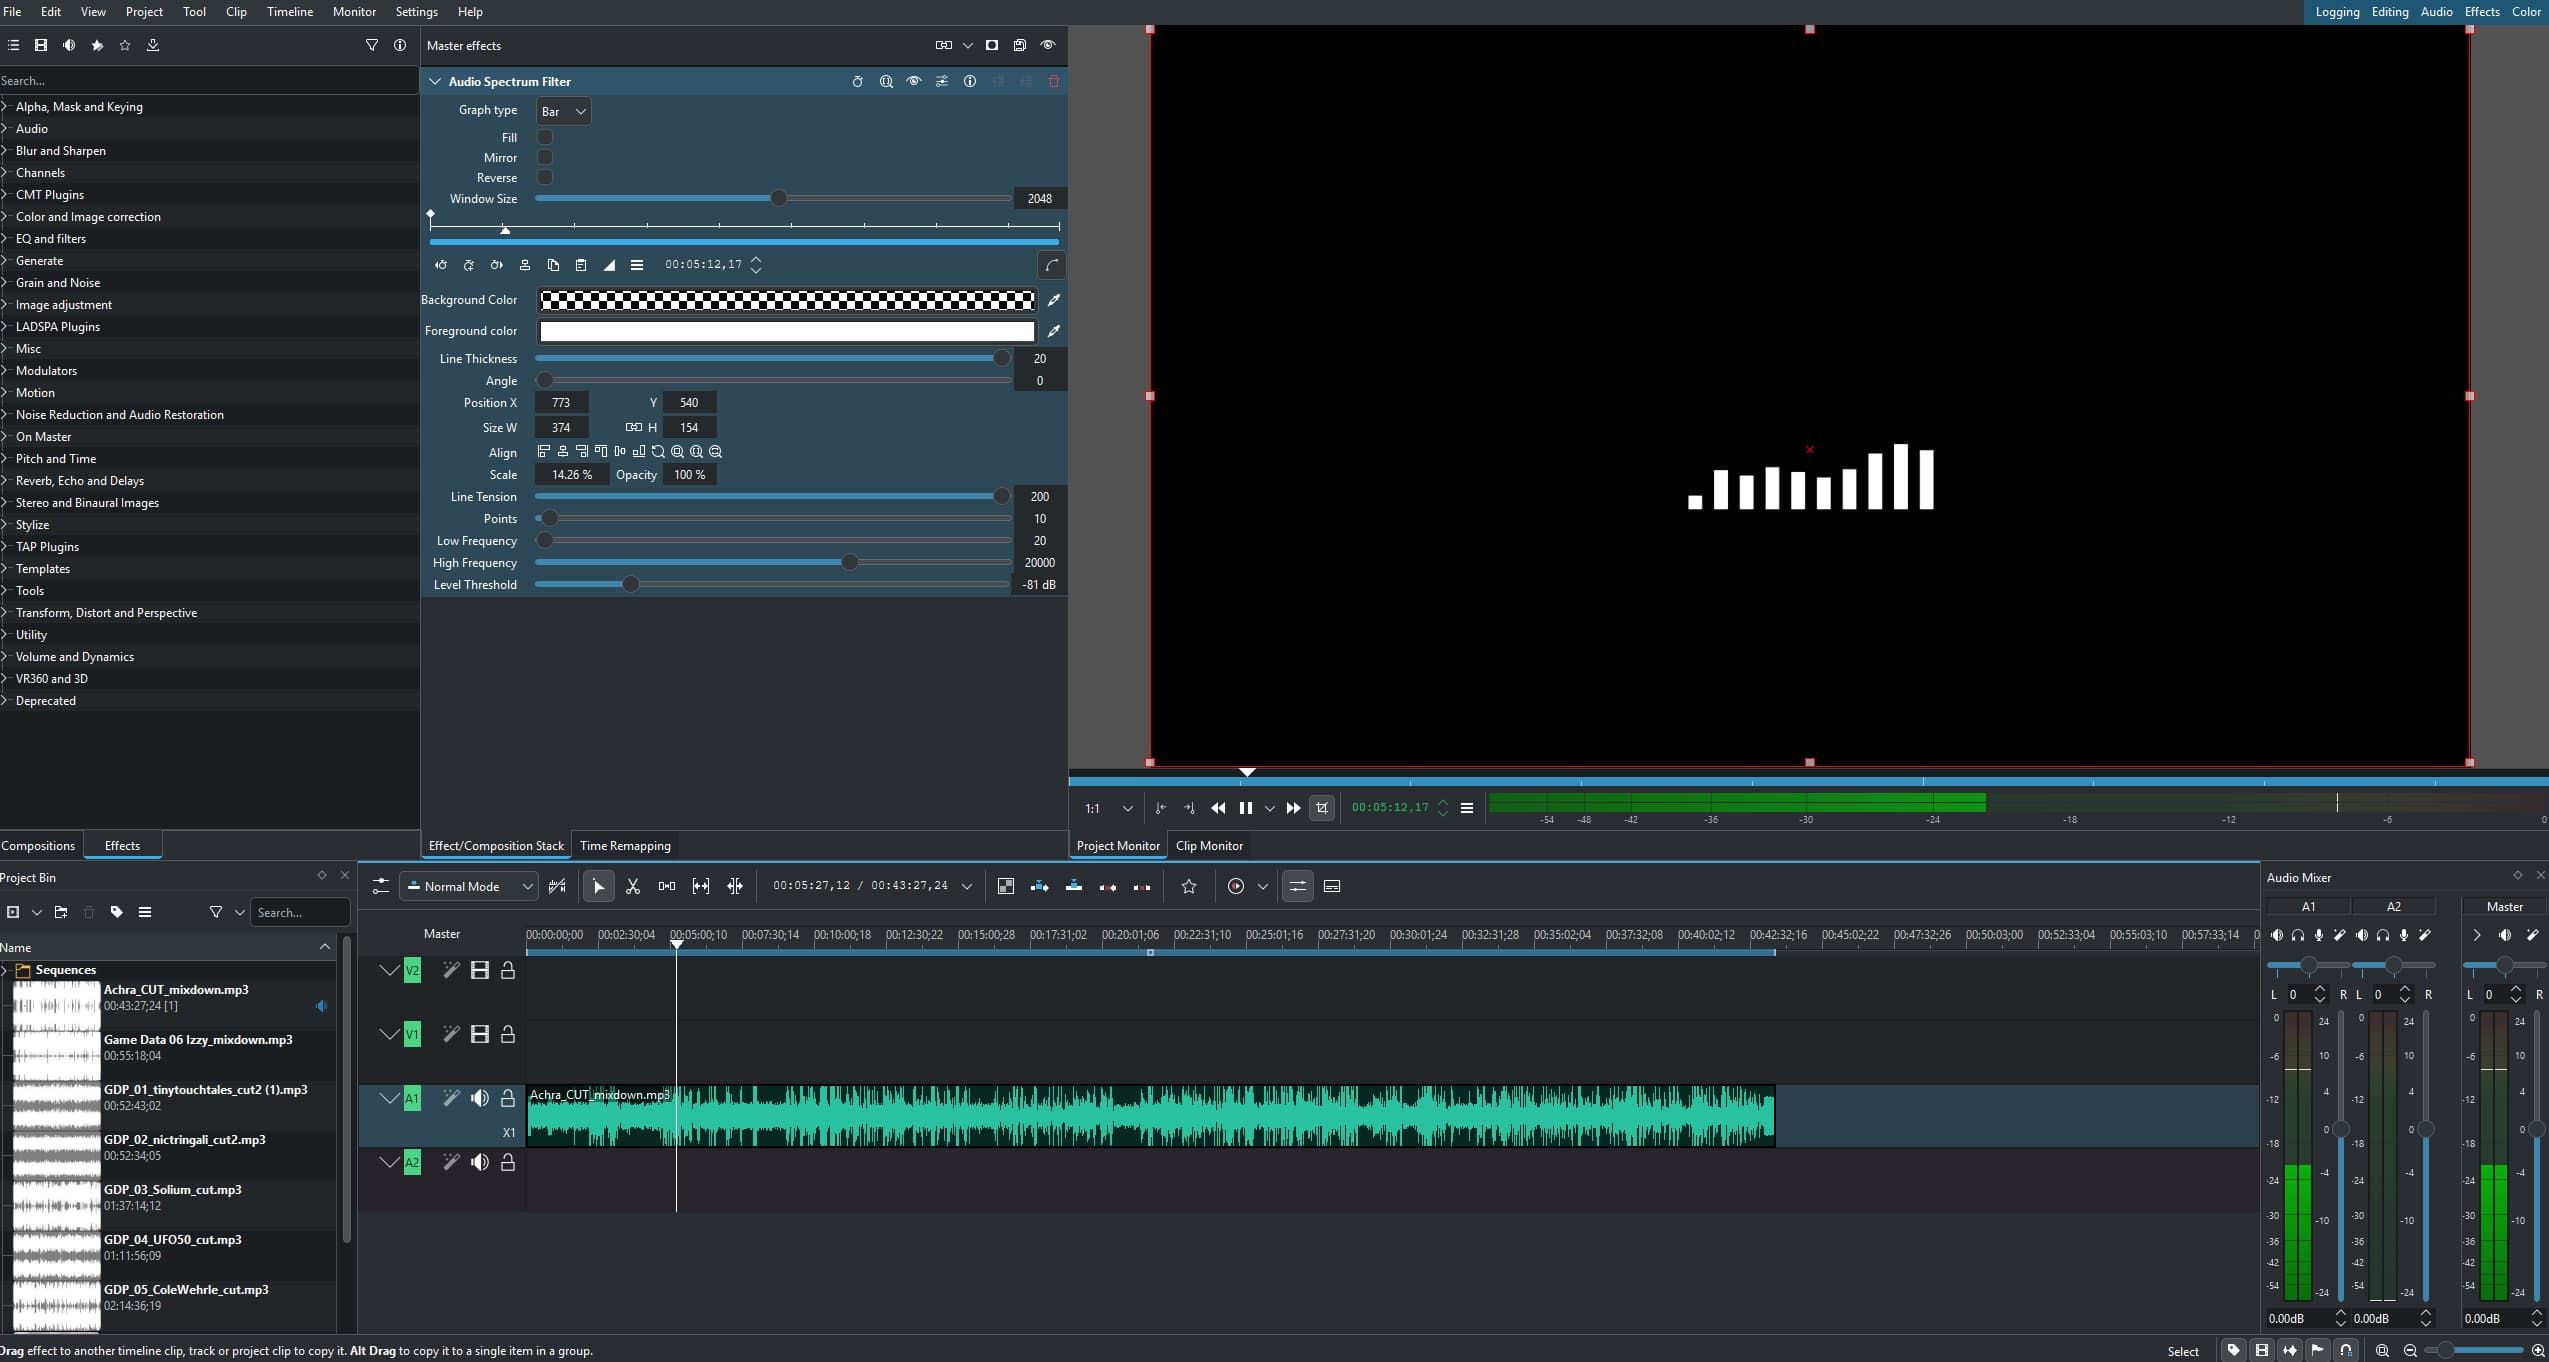
I tweaked the settings to get something that I wanted, and just rendered this video out. These spectrums I do have to render individually for each podcast episode, but they render pretty fast at about 10-20 minutes based on episode length.
I used the same Screen blend filter on the timeline in Resolve to get a transparent background, and laid it in the timeline. I applied some scaling and repositioning to fit properly under the middle graphic.
Conclusion
And that’s it! What’s nice about all these techniques for these videos is that the pipeline for getting new videos out is simple. When I get a new final edit of the audio (shout out to Josh Calixto for editing!), I just:
- Render the waveform in Kdenlive
- Bring that into Resolve
- Duplicate a previous timeline
- Edit the Fusion comp for titles to reflect the correct episode number, host, and game titles
- Import the new audio and lay it in the timeline
- Replace (literally in Resolve “Replace Clip” terms — I do this to maintain the same scale transforms on the waveform) the old waveform with the new one.
- Rate stretch the progress bar video to match the length of the new audio
- Adjust the runtime of the other elements to match the new audio
- Export!
Minus the render times, the whole process takes about 5 minutes. Not too shabby!
Again, here’s it all put together in motion:
Thanks for reading! Hope you learned something about basic motion graphics and what not to do for certain workflows. I also think the audio spectrum render portion for going into Resolve will be useful for a lot of people, as I saw TONS of comments about people looking for how to do this, so hope this helps!
Published on June 23, 2025.